Quickie post today to share a card I made for the Inspiration Project roundup post at STAMPlorations. The background panel is one of several Gelli prints I did using an ARTplorations stencil (Hearts Tumbled). Trimmed it down to size with a stitched die and adhered to the card base. Stamped the rose, label, and sentiment from Blossom Overture. I used my Japanese watercolor brush pens to color the rose. Added a little more faux texture on the panel with some grunge stamps (Mixed Media Grunge), adhered all the elements, and the card is done.
Inspired to CASE my card? If you are, make sure you link up your creation to the Inspiration CASE Playground found here by April 5. You may just win a $15 gift certificate or your choice of any 2 ARTplorations stencil. You'll find more cards by the STAMPlorations girls to CASE.
Hello! I've got a watercolor one layer card to share today. It isn't something I normally make because one thing I cannot do is draw people/faces! Objects I can draw, no problem...but faces? I know I suck at it. However, I couldn't help but take up the challenge at Inkspirational, where it's to create She Art or use an image of a woman, especially when the last time I created She Art projects was more than a couple of years ago. Here's the first She Art project I made back in 2013:
Be True to Yourself She Art Mixed Media on 6x6 canvas panel. 1/26/2013
I did about half a dozen She Art projects after my first one and sold them through a local shop. As much as I was excited to create She Art, I soon discovered it wasn't really what I enjoyed making. I mostly ended up frustrated because I had a difficult time drawing people or doing faces. And so I stopped making She Art inspired projects after that.
Anyway, I thought I'd give She Art another go when I saw the current Inkspirational challenge. I'm woman enough to admit that I still suck at it LOL! But hey, this time around, I enjoyed the process and didn't get frustrated. I got to play with my watercolors and stamps and it helped me relax after a week of unscheduled doctor visits and stressful lab tests.
I kept things simple by doing a one layer card. I stamped the daises, roses, and butterfly in antique linen Distress ink on 140-lb watercolor paper, masking as I stamped. Then I took my Prang watercolors and watercolored the images, layering the colors in between drying the layers with my heat tool. Took about 45 minutes to do this -- and it isn't something I'd normally do because I'm very impatient, but in this case, it was a welcome relief for me. After the watercolors dried, I stamped over the images again with peanut brittle Memento Luxe ink. I drew the face using Faber-Castell Big Brush pen. Does the girl's eye look closed to you? Yes? Maybe? Good enough for me! I originally wanted it to be open but again...I suck at drawing faces and drew the shape of the eye way too big. So I improvised and just added "lashes" at the bottom. I watercolored the face and then stamped the sentiment.
I'm quite happy with how the card turned out, but I gotta say, it will be a long time before I attempt another one like it. Thanks to the Inkspirational DT for the She Art challenge :o)
Anyway, my card also doubles as the inspiration project over at the STAMPlorations blog. Check out what the girls in the Inspiration DT made here. If you're inspired by my card or any of the cards by the Inspiration DT, I hope you'll come play with us at the Inspiration CASE Playground (open until April 5). We highlight the best CASEs and randomly draw one winner of a $15 gift certificate.
Hello! Popping by before I call it a night to share a card I made a couple of hours ago. I used a fun monoprinting technique: stamping on Gelli plate. I've got more info (and pics of how I pulled the prints) on this card here.
My card also works as a reminder for our current challenge over at The Mixed Media Card Challenge. For March, the theme is Hints of Spring. There's still 6 days to join in the fun and link up your spring-inspired mixed media cards!
We've got a brand new challenge at Time Out Challenges! For the next two weeks, the theme is Clean and Simple with the optional twist of black and white + a splash of one color. Create a project with the optional twist and you can win a $20 gift certificate from our sponsor, CAS-ual Friday. We're joined by a very talented guest designer, Susanne of Keep in Touch! I hope you'll stop by her blog, as well as the TO blog and check out their fabulous CAS creations :o)
To create my card, I brayered different shades of blue acrylic paints on my Gelli plate, placed the Happy Flowers stencil on top, laid the cardstock panel, and pulled the print. I stamped the sentiment from Blossom Overture in black ink, popped up the panel on the card base, and the card is done. Easy peasy clean and simple card :o)
Also wanted to share that I'm over at the STAMPlorations blog with a one layer mixed media card featuring one of my favorite mixed media techniques: stamping on gesso. The step-by-step photo tutorial is here.
Thanks so much for stopping by! Don't forget to smile :o)
Happy Monday! Here's a one layer card I made for thenew sketch challenge over at the STAMPlorations blog. For the next couple of weeks, we're playing with this fun sketch:
Instead of using layers of paper or die-cuts (which isn't really my style), I went with layers of images and colors to create this grunge-yet-still-CAS one layer card. I stamped the various mixed media elements (from Mixed Media Grunge) in HA inks. I balanced the sentiment with the distressed frame (both from Blossom Overture), and the frame also works to nicely draw the eye to the grunge floral image on the left. The collage look gives this card dimension even though it's just one layer.
Check out how the rest of the STAMPlorations girls interpreted the sketch here. We're also joined by 3 awesome cardmakers: Robyn, Kathy, and Stephanie. And we hope to see your take on the sketch too!
It's inspiration time from the STAMPlorations Inspiration Team! I'm joining the girls today for another batch of cards to CASE.
To create my card, I took a panel that's smaller than my card base and used stamps from the Mixed Media Grunge set to create the background. (It's the April/May 2015 stamp club set that will be available in the shop beginning on the first week of April.) I toned down the brown with a thin layer of gesso. Once the gesso dried, I scribbled Gelatos (mango, lemon, metallic mint, and lavender) and blended the colors with my finger. I placed the Honeycomb Delight ARTplorations stencil on the panel, took a baby wipe, and proceeded to wipe away some of the colors through the stencil. Next I took a black watercolor pencil and traced inside the hexagons and ran a damp brush over it to blend the color a bit. I cut the panel in two, distressed the edges, and applied coffee archival ink around before adhering the panels to my card base. The sentiment is from Hashtag Authentic.
Stop by the STAMPlorations blog to see some more awesome inspiration from the team! If you decide to CASE my card or any of the cards by the team, link it up to the Inspiration CASE Playground by April 5. You can win a $15 gift certificate to the shop or your choice of 2 ARTplorations stencils :o)
PS: Today is the last day to comment on the projects for the ARTplorations Stencil Blog Hop! Lots of prizes to be won and all you gotta do is check out the designers' blogs and comment along the way :o) Start the hop here.
PPS: Did you make projects using stencils (any brand) within the last 6 months? If yes, link them up to the Flash Stencil Linky Party by Saturday, March 14, 11:55 p.m. PDT (GMT-7) and win some cool ARTplorations stencils!
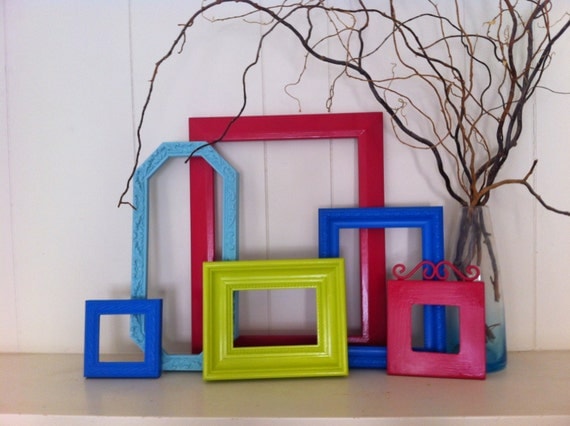
We continue to celebrate Time Out Challenges' first birthday! To celebrate the occasion, we're sponsored by Uniko and STAMPlorations, who are offering gift certificates to their shops.
We'd love you to play along and create a project that's inspired by this photo:
Joining the TO girls this week is guest designer Mandi of Faith, Hope and Crafts. I hope you'll come check out the TO blog, take a look at some more projects, and play along with us!
I continue my love affair with my Gelli plate with my one layer card. I made this card for someone -- it winged its way to the east coast early last week, when the recipient was still in the US. I'm not sure she received it before she left yesterday! I blame the snow for the mail delivery delay :o( In any case, I took my inspiration from the colors in the photo -- blue, yellow, brown...and then some green (as I imagined those twigs in the vase used to have verdant leaves). I made a negative print using the ARTplorations Happy Flowers stencil. This is the same monoprinting technique I used to make this card here -- I simply brayered different colors of acrylic paints instead of just one. Here's the 90-second video tutorial I made earlier in the week to demo this technique:
Once the print was dry, I stamped the sentiment from Blossom Overture, added a bit of faux texture by partially stamping on the background with Live Love Laugh, and then finished the card by adding the blue border with my Japanese watercolor brush marker.
It's DAY 3 -- the last day! -- of the fun ARTplorations stencil blog hop! In the last 3 days, the STAMPlorations girls have been sharing projects showcasing ARTplorations stencils. I hope you've enjoyed the hop and have been inspired by the many projects we've shared. We're giving away prizes along the way too. Simply leave a comment here, on my team's blogs, and on the STAMPlorations blog by Friday, March 13, for lots of chances to win one of several prizes.
For my 2 previous cards, you've seen me use prints where I did negative space monoprinting. However, I've only used one stencil for each print. This time around, I thought about using the same technique on several stencils. And instead of having the panels pre-cut, I pulled prints on whole sheets of cardstock and then trimmed them to size later. Before pulling the negative print, though, I pulled two positive prints. I made another short video (80 seconds!) to show you how it's done:
In the video, I used purple acrylic paint. I had done a few prints earlier using blue paint but I forgot to set up my video when I was doing my initial prints :o) It would also explain why the stencils in the video are dirty -- I've used them earlier and simply let the paint dry instead of washing them (I'm lazy that way). Anyway, the end result is that I ended up with 8 cards from the negative prints (4 purple, 4 blue). I had 4 whole sheets of positive prints that I set aside and will use later. Stencils I used: Butterfly Dance, Leaf Prints, Shutters, Old Rose Prints, and Brackets.
Here's the blue version:
The print looks grungy and graphic enough that it didn't need any more stamping. I simply adhered the panel to the card base. Then on a piece of cardstock, I stamped the label and sentiment from the Blossom Overture set, fussy cut it, and stuck it to the panel with foam dots for a little dimension. And I've got a graphic card done! Well, make that 8! I'm a happy camper!
Check out what the rest of the team made! You'll find links to all our Day 3 Projects here. If you missed any of the projects, you can always go back to the STAMPlorations blog and start from there. Commenting is open until Friday so you still have 3 days to hop along. We'll announce the winners on Sunday, March 15, so be sure to check the blog then to see if you're the winner of an ARTplorations stencil or a $15 gift certificate.
Thanks for stopping by! Don't forget to smile :o)
~Shery
PS: I hope you enjoyed my mini video tutorials! If you like them and would like to see similar tutorials, leave a comment letting me know and I'll do my best to accommodate. Please also consider following my blog so you don't miss my other videos :o)
It's DAY 2 of the fun ARTplorations stencil blog hop! For 3 whole days, the STAMPlorations girls are sharing projects showcasing ARTplorations stencils. We've got prizes too for hoppers! Simply leave a comment here, on my team's blogs, and on the STAMPlorations blog by Friday, March 13, for lots of chances to win one of several prizes.
Using my Gelli plate has been the easiest and quickest way for me to make cards lately. Time and energy are at a premium since I'm pregnant. I'm in my second trimester (15 1/2 weeks today) but I'm still dealing with the morning sickness, lack of sleep, and exhaustion, so I need to use my time at the craft table wisely. For my card today, I used the Honeycomb Delight stencil. This time around, I managed to pull 5 prints (for 5 cards!) by doing layered monoprinting. Here's another short video (90 seconds) showing how I pulled each print:
I created 5 cards out of the prints and what you're seeing today is the card made from print #5. (I'm saving the others for showing later.) I may be in love with blue lately, but orange is one of two of my favorite colors of all time :o). I mounted the print to my card base and worked on adding some faux textures: I used Mixed Media Grunge (a fun new set coming this April) and butterflies from Trendy Butterflies and I stamped them in coffee (brown) archival ink. The sentiment is from Hashtag Authentic and the brush stroke is from Celebrate Artsy. My grunge-lovin' artsy heart is totally lovin' this card :o)
Check out what the rest of the team made! You'll find links to all our projects here. Stop by again tomorrow for DAY 3 of the ARTplorations stencil blog hop!
I'm no good at color challenges, but I couldn't resist playing at Colour Me -- where it's Tangelo Twist (orange) + Neutral. This orange-lovin' girl just had to play :o)
It's DAY 1 of the fun ARTplorations stencil blog hop! For the next 3 days, the STAMPlorations girls will be sharing projects showcasing ARTplorations stencils. And a blog hop wouldn't be complete without prizes along the way! Simply leave a comment here, on my team's blogs, and on the STAMPlorations blog by Friday, March 13, for lots of chances to win one of several prizes.
SIX (6) winners (2 winners per day) randomly drawn from all comments left on the designers' blogs will win their choice of ARTplorations stencil. THREE (3) winners (1 winner per day) randomly drawn from comments left on the STAMPlorations blog will each win a $15 gift certificate to the STAMPlorations shop. Plus there'll be surprise prizes along the way :o)
For my card, I did some monoprinting using the Happy Flowers stencil, Gelli plate, and acrylic paints. I was able to pull 4 prints from this one. I went monochromatic and used 3 different shades of blue acrylic paints on my Gelli plate. Rather than describe how each print looks, here's a short video (under 90 seconds):
I picked one of the prints I did after the paint was dry and mounted it to my card base. For the background, I used stamps from Mixed Media Grunge, the April/May 2015 stamp club set that will be available in the shop beginning on the first week of April. (If you're a stamp club member, you'll get to preview the set on March 15 and you'll receive this when your subscription renews in April or May.) The sentiment is from the Hashtag Authentic set.
Check out what the rest of the team made! You'll find links to all our projects here. Stop by again tomorrow for DAY 2 of the ARTplorations stencil blog hop!
At Time Out Challenges, we are celebrating our first birthday! A year ago, I was honored to have been invited by Nonni and Sandie to join the TO design team. Since then it's been a fun ride and I'm excited for the future and to join the talented TO girls into its second year.
For this challenge, we have the inspiration photo below. We'd love you to create a project based on it -- you can take inspiration from the frames, the white wooden panel, the colors, the branch. Because it's a birthday celebration challenge, there are prizes! The winner (as voted by the DT) will win gift certificates from Uniko and STAMPlorations. And one winner (randomly drawn) will win an ARTplorations Celebration/Birthday stencil pack from STAMPlorations. Do check out the projects that my teammates created, as well as the card by our guest designer, Mandi.
For my card, I was inspired by the bright, happy colors and the frames. For the artsy flower imprint, I used the Happy Flowers stencils from ARTplorations. It's actually leftover paint on the stencil when I used it on another card. I used Distress paints then flipped over the stencil, laid it on top of my card base, and brayered over it to transfer the paint. (This is the same technique I used to create the second coffee card found here.) I stamped the sentiment from the new set, Blossom Overture, by STAMPlorations and finished the card by adding the bright orange border with a Japanese watercolor brush marker.
It's a new challenge over at the One Layer Christmas Card blog! It's always Anything Goes Christmas card so long as the card is one layer (definition is here). There's an optional twist: GLITTER. Take a look at the cards the rest of the OLCC girls made here -- they're gorgeous! We hope you'll play along. The challenge is open until March 16 and there's a prize for one lucky player who links up a card that uses the twist!
For my card, I skipped the glitter. On my Gelli plate, I brayered green, red, and gold acrylic paints then placed the Holiday Words stencil/mask (reversed) from ARTplorations. Next I laid my card base over the stencil, covered it with scrap paper and then brayered over to transfer the print. Not wanting to waste the paint, I pulled another print for a second card (which I set aside and intend to finish later). I drew a black border and the card is done! :o)
I'd like to link up my card to the following fun challenges:
Supplies: Stencil - Holiday Words from ARTplorations/STAMPlorations; Marker - Black Big Brush pen from Faber-Castell; Paper - 100# classic white premium heavy weight cardstock from Paper and More; Other: acrylic paints, Gelli plate, brayer