Wednesday, September 28, 2016

Paper craft project no. 464: Hope is stronger than fear one layer card


Hello! There's a special challenge at Time Out for the next couple of weeks. The theme is Breast Cancer Awareness and/or Friendship with the optional technique twist of embossing and/or using pink. Sponsoring this challenge is CAS-ual Fridays.

My card's pretty simple and I went with the optional twist of using pink. I sponged ink through a stencil (Rows of Hearts) and then stamped the ribbon and sentiment.

Check out the cards the team + guest designer Coni made and then link up your own project. We can't wait to see your creations!

Thanks for stopping by! Don't forget to smile :o)


Friday, September 23, 2016

Paper craft project no. 463: Cards for coffee lovers


Howdy! Sharing a few cards I made for the Fall Coffee Lovers Blog Hop. My little stamp company, STAMPlorations, is once again one of many super sponsors. Aside from the prizes we're offering for the hop, we're also giving away a couple extra prizes on the STAMPlorations blog. Together with STAMPlorations girls Melissa, Vicki, Karola, and Becca, we're sharing projects that feature some fab new coffee-themed stamps and dies in the STAMPlorations store!


Here are my cards up close. I'm all for quick makes these days. For the background on all my cards, I did some monoprinting with my Gelli plate using one of the newer ARTplorations stencils, Bloom Boldly. Managed to pull 4 prints (I'm saving the 4th one for a card later on). I already had a few diecuts and stamped images done so it was simply a matter of picking the ones I wanted to use and adhering them on the card fronts. My backgrounds were already  colorful so I left the diecuts white and the stamped images uncolored :o)


I used two new CUTplorations dies: Coffee Cup Silhouette and Coffee.


For this card, I used the new Anywhere There's Coffee stamp and die set.


And last, for this card I used the new Framed Coffee To Go 2 and CUTplorations Oh Frap! die.

Thanks for stopping by! Don't forget to smile :o)


Wednesday, September 21, 2016

Paper craft project no. 462: Trendy Christmas Trees


Today are having another special stamp release hop for the latest stamp set to join the "trendy" series: Trendy Christmas Trees. This stamp set comes with coordinating CUTplorations dies as well :o) So I hope you'll hop on over the blog and leave a comment on the special stamp release post, as well as on the participating designers blogs for a chance to win this set.


Here's what I made to showcase this set:
For this card, I also used the Stitched Snow Hills and Be Jolly phrase dies.

For these tags, I also used Luggage Tags nesting dies.

Check out what Julie, Tenia, and Toni created using Trendy Christmas Trees -- leave a comment here, on their blogs, and on the STAMPlorations blog by Friday and you could win this set :o) And until September 27, Trendy Christmas Trees is 10% off.

Thanks for stopping by! Don't forget to smile :o)


Thursday, September 15, 2016

Paper craft project no. 461: Warm Hands, Warm Hearts


It's release time at STAMPlorations and this time around, we're doing the first CUTplorations Christmas release blog hop and linky party! For 3 days (starting yesterday), the STAMPlorations girls are sharing projects that showcase 2 brand new Christmas stamp sets with coordinating dies, 15 word/phrase dies, a set of border/edge dies, and an ATC/gift card holder die.


Yesterday, the spotlight was on Shirley's super fun Christmas Reindeer set in this post. Today' the spotlight is on the stamp set and coordinating dies that I designed, Warm Hands, Warm Hearts, in this post.


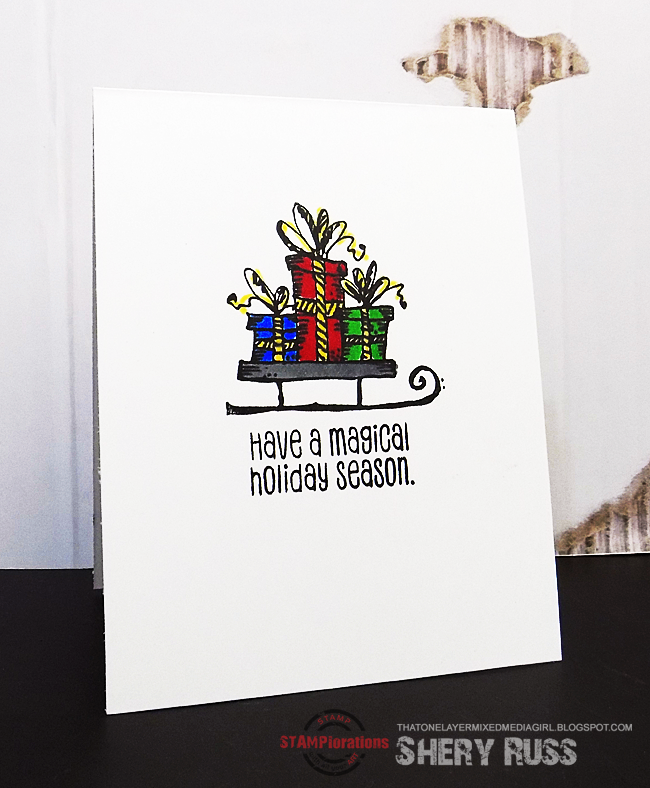
I went clean and simple for my two cards because I need Christmas cards that are easy and fast to reproduce. Christmas is right around the corner and I need to really get going on my Christmas card stash.

Meet easy and quick card #1. 
No guesswork on how I made this card. It's straightforward stamp, color, and done! It took me less than 3 minutes from start to finish. I know my MIL needs close to 100 Christmas cards every year so I figure I can easily squeeze in some cardmaking for her and create 20 to 25 of this design, and color the gifts on the sleigh while I watch Netflix with the hubby :o)


Meet easy and quick card #2.
This one took a bit longer than card #1 to make (about 7 minutes), but it's still relatively simple to do. I used the large Christmas gift to create my background and then stamped and colored one before die-cutting it and adhering to the card base. I added interest by stamping some splatters, coffee rings, and stars (from Art Marks) in Delicata gold. I left off the sentiment because I didn't think it needed one. But I'll probably stamp the "Ho! Ho! Ho!" sentiment in the batch of cards I'll make following this design.

I hope you'll check out the cards that Deepti, Shirley, Vicki, and Kim made using the Warm Hands, Warm Hearts stamps and dies. 

Leave a comment here, on the participating designers blogs, and on the STAMPlorations post here by Tuesday, September 20 at 11:55 p.m. for a shot at snagging one of 3 gift certificates. And if you create a project featuring diecuts/dies (any brand) and link it up to our flash stencil linky party, you get a chance to win one of 2 prizes: your choice of 3 holiday-themed word/phrase dies, or your choice of Christmas stamp set and coordinating dies. 

Thanks for stopping by! Don't forget to smile :o)


Wednesday, September 14, 2016

Paper craft project no. 460: Grateful beyond words


We have a brand new challenge at Time Out. For the next couple of weeks, it's the Home Sweet Home challenge. Here's the inspiration photo, and it's really perfect for fall! This challenge is sponsored by STAMPlorations. The winner (voted by the design team) will get a $10 gift certificate. Two winners will be randomly drawn to win stamps: one will win Holiday Expressions: Thankful for Autumn and the other will receive Trendy Leaves 2.


I took my cue from the colors and the leaves and created this almost one layer card. I sponged Distress inks (spiced marmalade, mustard seed, barn door) through a stencil (Bloom Boldly). Then I die-cut the curvy panel by combining two CUTplorations dies (Crazy Double Running Stitch Rectangles and Stitched Snow Hills) and stamped one of the newsprint leaves (Trendy Leaves 2). I adhered the panel on the left side of the card base and added contrast between the stenciled blooms and stamped leaves by doodling the border with a black marker. I finished the card by stamping the sentiment (Grateful Beyond Words).

Check out the cards the team + guest designer Claire made and then link up your own project inspired by the photo. We can't wait to see your creations!

Linking up my card to these fun challenges:
*****
The Kat Report
[Snapshots of life with my daughter.]

Last Sunday, the Kat and I had our first girls day out. I've only taken her out by myself twice before but that was to attend cradle roll at church, which was a mere 12-minute drive from our house. This time I took her to Target, a 20-minute drive, to shop for some new clothes for her. We left her daddy at home to sleep and rest. 

She was the perfect little passenger in the backseat. Once at a stop sign, I glanced over at her baby mirror and saw that she was quietly sipping water from her cup. I couldn't stop myself from smiling as I watched her place the cup back in the cup holder and then pull the blankie over her legs before looking out the window to admire the view outside.

At Target, she was happy to look around. She pointed at everything and frequently let out a "Ahh! Ahh! Ehh! Ehh!" -- in Kat speak, that translates to, "Look, mommy! I like that one!"

We spent the first hour walking down all the aisles. After we had quickly surveyed everything in the shop, we headed to the toddler section and started looking for clothes. Fifteen minutes into it, the Kat started getting cranky, which meant she was sleepy. So I pushed her down the diaper and baby food aisles and she was out 5 minutes later. She ended up napping for an hour while I went through baby clothes. I dislike shopping, but ever since I got pregnant, I've taken to shopping for her. 

Before we left home, her daddy had sleepily said, "Be judicious," when I said that I was going to shop for Kat's clothes. And yet there I was at the toddler section with at least $100 worth of baby clothes. I realized that spending that much money on clothes for a growing baby is a bit foolish so I started going through my selection and putting back the ones that I wanted for no reason other than I thought they were the cutest. In the end I ended up getting her 4 long-sleeved 2T tops that were $5 each and 2 baby tights that were on clearance ($5 for both). When I mentioned the clothes I didn't buy to my MIL, she said, "You need to take me with you next time. I want to buy those for her." This is one more reason I adore my mother-in-law ;o)

*****

Thanks for stopping by! Don't forget to smile :o)


Thursday, September 8, 2016

The Kat Report: Top 3 Strategies for Luring Mommy Into the Kat Pen

#1 - Pick something off carpet, show mommy, and then proceed to put it in mouth. Doesn't matter if it's imaginary; mommy will come to check whether or not it's something safe for me to ingest. To ensure success, run-crawl towards the center of Kat pen; this forces mommy to enter my lair. This works 90% of the time.

#2 - Start making pushing sounds. Mommy will come to check if I need a diaper change. Start running to opposite direction to make mommy chase me. Evade mommy by crawling towards center of Kat pen. If mommy doesn't enter pen, make more pushing sounds and look convincing -- watery eyes and all. This works 95% of the time.


#3 - Sit behind toy chest, hidden from mommy's view, and quietly work on removing pants. 10 minutes of quiet will make mommy get up from whatever she's doing and see what I'm up to. If she doesn't come right away, stand up and triumphantly wave pants at mommy while giving her a look that says, "If you don't come to the Kat pen, the diaper comes off next." This has a 99% success rate - mommy learned her lesson after one time of ignoring me and the pants.

Wednesday, September 7, 2016

Paper craft project no. 459: Trendy Leaves 2


Today we're officially releasing another new STAMPlorations stamp set: Trendy Leaves 2. This stamp set comes with coordinating CUTplorations dies -- yay! :o) We've got a mini hop for it -- hop on over the blog and leave a comment on the special stamp release post, as well as on the participating designers blogs for a chance to win this set.


To showcase this set, I made 3 cards:


Card #1: Grateful Beyond Words
Pretty simple one layer card. I stamped the leaves in coffee archival ink all over the card base, leaving a little room for the sentiment (Grateful Beyond Words) and then sponging Distress inks on the top part of the card and through a stencil (Art Splatters).


Card #2: Happy
I admit I got a little too diecut and layer happy with this one ;o) I cut a panel using the largest stitched rectangle die from the Crazy Double Running Stitch Rectangle Nesting dies then stamped the leaves before cutting up the panel using the new Stitched Snow Hill edge dies and then adhering to my card base. Then  diecut and stamped a few leaves, as well as diecut two Happy.


Card #3: Thanks
For this last card, I played with my sticker labels. I stamped the leaves onto a sheet of 4x2 labels (10 in a sheet) watercolored them with Kuretaki Gansai Tambi watercolors. When the sheet was dry, I peeled off two labels and stuck them to my card base. I added some stitching and then hand-lettered the THANKS with a black Sharpie marker.


Check out what Lynne, Carol, Asmah, and MariLynne created using Trendy Leaves 2 -- leave a comment here, on their blogs, and on the STAMPlorations blog by Friday and you could win this set :o) And until September 13, Trendy Leaves 2 is 10% off.

Thanks for stopping by! Don't forget to smile :o)


Related Posts Plugin for WordPress, Blogger...